When you open Excel for the first time, the Excel Start Screen will
appear. From here, you'll be able to create a new workbook, choose a
template, and access your recently edited workbooks.
1. From the Excel Start Screen, locate and select Blank workbook to access the Excel interface.
1. From the Excel Start Screen, locate and select Blank workbook to access the Excel interface.
2. Click Open Other Workbooks to work on an existing
workbook.

To set up Excel so it automatically opens a new workbook
1. Click File then Options.
2. On the General tab, underStart up options, uncheck the Show the Start screen when this application starts
box.
3. The next time you start Excel, it opens a blank workbook
automatically similar to older versions of Excel.
2.1. The Excel Interface
After starting Excel, you will see two windows - one within the other.
The outer window is the ApplicationWindow and the inner window is the Workbook Window. When maximized, the Excel Workbook
Window blends in with the Application Window.
After completing this module, you should be able to:
Ø Identify the components of the Application Window.
Ø Identify the components of the Workbook Window.
 |
2.1.1. The Application Window
The Application Window provides the space for your worksheets and
workbook elements such as charts.
The components of the Application Window are described below.
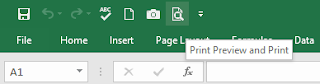
Ø The Quick Access Toolbar
The Quick Access Toolbar lets you access common commands no matter which tab is selected.
By default, it includes the Save, Undo, and Repeat commands. You can
add other commands depending on your preference.
To add commands to the Quick Access toolbar
1. Click the drop-down arrow to the right of the Quick Access toolbar.
2. Select the command you wish to add from the
drop-down menu. To choose from more commands, select More Commands.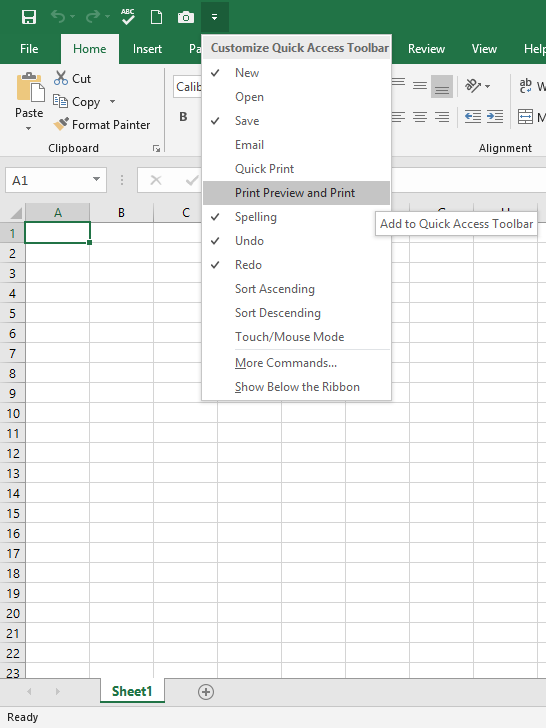
3. The command will be added to the Quick Access
toolbar.

Ø The Ribbon
The Ribbon
contains multiple tabs, each with several groups of commands. You will use these tabs to perform
the most common tasks in Excel.

The Ribbon is designed to respond to your current task, but you can
choose to minimize it if you find that it takes up too
much screen space.
1. Click the Ribbon Display Options arrow in the
upper-right corner of the Ribbon.

2. Select the desired minimizing option from the
drop-down menu:
Auto-hide Ribbon:
Auto-hide displays your workbook in full-screen mode and completely
hides the Ribbon. To show the Ribbon, click the Expand Ribbon command at the top of screen.


Show Tabs:
This option hides all command groups when not in use, buttabs will remain visible. To show the Ribbon, simply click a tab.
Show Tabs and Commands:
This option maximizes the Ribbon. All of the tabs and commands will be
visible. This option is selected by default when you open Excel for the
first time.
To Customize the Ribbon in Excel
You can customize the Ribbon by creating your own tabs
with whichever commands you want. Commands are always housed within a group, and you can create as many groups as you want
in order to keep your tab organized. If you want, you can even add
commands to any of the default tabs, as long as you create a custom
group in the tab.
1. Right-click the Ribbon and then select Customize the Ribbon... from the drop-down menu.


2. The Excel Options dialog box will appear. Locate
and select New Tab.

3. Make sure the New Group is selected, select a command, and then click Add. You can
also drag commands directly into a group.
4. When you are done adding commands, click OK. The
commands will be added to the Ribbon.

Ø The Formula Bar
In the formula bar, you can enter or editdata, a formula, or a function that will appear in a specific cell.
In the image below, cell C1 is selected and 1984 is entered into the
formula bar. Note how the data appears in both the formula bar and in
cell C1.


Ø The Name Box
The Name box displays the location,
or "name" of a selected cell.
In the image below, cell B4 is selected. Note that cell B4 is where
column B and row 4 intersect.

Ø The Backstage View (The File Menu)
Click the File tab on the Ribbon. Backstage view will appear.


Ø The Worksheet Views
Excel has a variety of viewing options that change how your workbook is
displayed. You can choose to view any workbook inNormal view, Page Layout view, or Page Break view. These views can be useful for various
tasks, especially if you're planning to print the
spreadsheet.
To change worksheet views, locate and select the
desired worksheet view command in the bottom-right
corner of the Excel window.


Ø Zoom Control
To use the Zoom control, click and drag the slider. The number to the right of the slider reflects
the zoom percentage.

Challenge!
1. Open Excel.
2. Click through all of the tabs, and review the commands on the Ribbon.
3. Try minimizing and maximizing the Ribbon.
4. Add a command to the Quick Access toolbar.
5. Navigate to Backstage view, and open your Account settings.
6. Try switching worksheet views.
7. Close Excel (you do not have to save the workbook).
2.1.2. The Workbook Window
In Excel, when you open up a new workbook it now contains only 1
worksheet There can be a max of 1,048,576 rows and 16,384 columns in an
excel work sheet.
Ø The Worksheet
Excel files are called workbooks. Each workbook holds
one or more worksheets (also known as "spreadsheets").
Whenever you create a new Excel workbook, it will contain one worksheet named Sheet1. A
worksheet is a grid of columns and rows where columns are designated by
letters running across the top of the worksheet and rows are designated
by numbers running down the left side of the worksheet.


When working with a large amount of data, you can create multiple worksheets to help organize your workbook and
make it easier to find content. You can also group
worksheets to quickly add information to multiple worksheets at the
same time.
To rename a worksheet
Whenever you create a new Excel workbook, it will contain one worksheet named Sheet1. You can
rename a worksheet to better reflect its content. In our example, we
will create a training log organized by month.
1. Right-click the worksheet you wish to rename, then
select Rename from
the worksheet
menu.

2. Type the desired name for the worksheet.

3. Click anywhere outside of the worksheet, or pressEnter on your keyboard. The worksheet will be renamed.

1. Locate and select the New sheet button.


2. A new, blank worksheet will
appear.
TIP:
To change the default number of worksheets, navigate
to Backstage view, click Options, and
then choose the desired number of worksheets to include in each new
workbook.


To delete a worksheet
1. Right-click the worksheet you wish to delete, then
select Delete from the worksheet
menu.


2. The worksheet will be deleted from your workbook.
Alternatively, from the Home Tab in theCells Group click on Delete and select Delete Sheet.
Warning:
The Undo button will not undo the deletion of a worksheet.
To copy a worksheet
If you need to duplicate the content of one worksheet to another, Excel
allows you to copy an existing worksheet.
1. Right-click the worksheet you want to copy, then select Move or Copy from the worksheet menu.

2. The Move or Copy dialog box will appear. Choose
where the sheet will appear in the Before sheet:
field. In our example, we'll choose (move to end) to
place the worksheet to the right of the existing worksheet.
3. Check the box next to Create a copy, then click OK.

4. The worksheet will be copied. It will have the same
title as the original worksheet, as well as a version number.
TIP:
You can also copy a worksheet to an entirely different workbook. You can select any workbook that is currently open from the To book: drop-down
menu.

To move a worksheet
Sometimes you may want to move a worksheet to
rearrange your workbook.
1. Select the worksheet you wish to move. The cursor
will become a small worksheet icon
.
2. Hold and drag the mouse until a small black arrow
 appears above the desired location.


3. Release the mouse. The worksheet will be moved.
To change the worksheet color
You can change a worksheet's color to help organize your
worksheets and make your workbook easier to navigate.
1. Right-click the desired worksheet, and hover the mouse over Tab Color. The Color menu will appear.
2. Select the desired color. A live preview of the new worksheet color will appear as you
hover the mouse over different options. In our example, we'll choose Red.


3. The worksheet color will be changed.


The worksheet color is considerably less noticeable when
the worksheet is selected. Select another worksheet to see how the color
will appear when the worksheet is not selected.
Challenge!
1. Open an existing Excel workbook.
2. Insert a new worksheet and rename it.
3. Delete a worksheet.
4. Move a worksheet.
5. Copy a worksheet.
Ø The Scrolling Buttons
These buttons scroll the display of sheet tabs one at a time or to display
the first and last grouping of sheet tabs and are located to the left of
the sheet tabs.


Ø The Scroll Bars
Your spreadsheet may frequently have more data than you can see on the
screen at once. Click, hold and drag the vertical or horizontal scroll bar
depending on what part of the page you want to see
